Getting Started
This chapter takes you from launching Automata Lab to saving and reopening a small project. It also shows how to load the bundled light-switch model and where to find validation details.
Launching Automata Lab
Open the Automata Lab application in your browser. The application requires no account and automatically connects to its built-in server at builtin://server. For a local installation, follow the Developer Guide's Development Setup chapter.
The initial page is Solver and the model tree is collapsed. You can create a project immediately or pull the bundled light-switch model from the connected server.
Unsaved work is volatile
The current authoring project lives in the browser page until you save it. Before closing or reloading the page, use File → Save or File → Save As if you want to keep your changes.
Application Layout
Automata Lab uses a compact desktop-style shell:
- The title area identifies the application and current project.
- The menu bar and toolbar provide project-wide commands.
- The model tree selects Editor, Chart, Solver, or Simulator pages.
- The main workspace shows the selected page, often as a master-and-detail view.
- The resizable Console records diagnostics and operation outcomes.
- The status bar shows the initial state, model counts, server connection, and status from the active page.
At narrower widths, the model tree and Console may become toggled drawers or separate panes. Their content remains available, and toolbar commands that do not fit move into the accessible More menu.
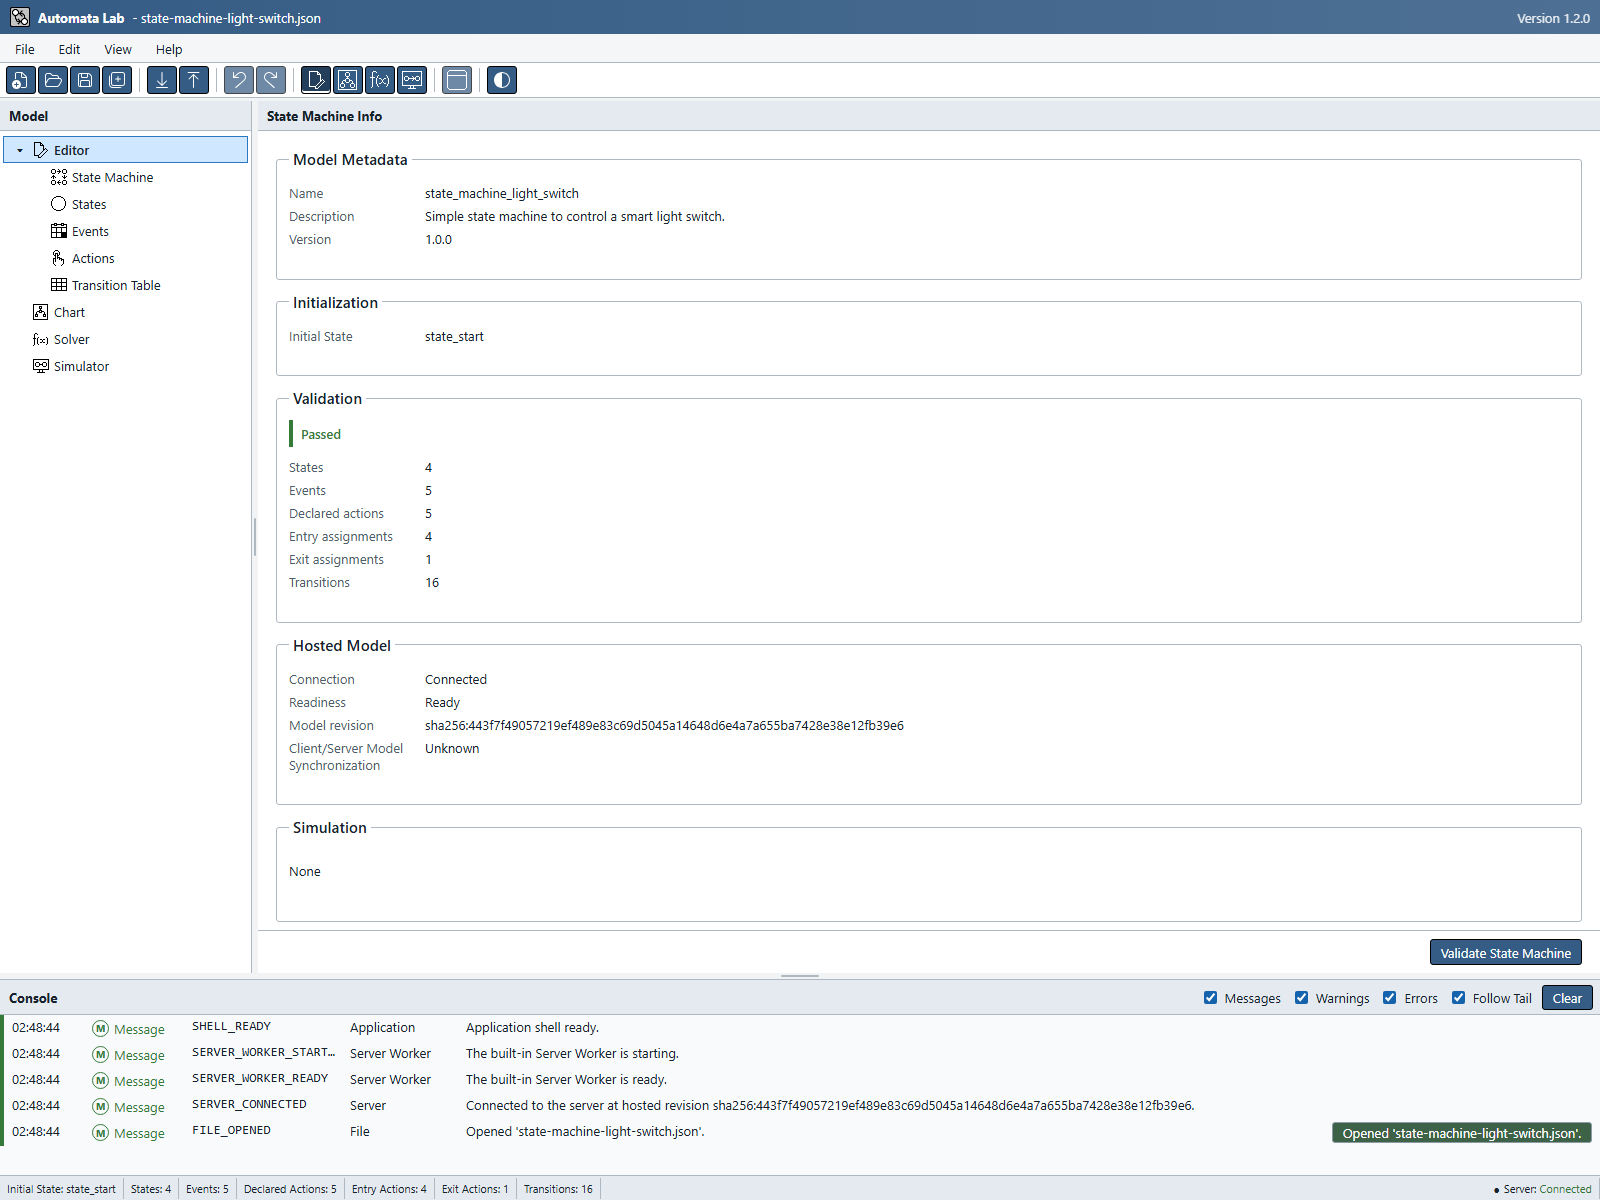
Use Figure UG-01 to locate the tree, workspace, Console, and status bar. The screenshots in this guide use the light-switch example in Light theme unless stated otherwise. Open a screenshot to inspect its full-size image.
Creating a Project
- Choose File → New, select New on the toolbar, or press Ctrl+N.
- In the model tree, open Editor → State Machine and enter the model name, description, and model version.
- Open Editor → States and add at least one state.
- Return to Editor → State Machine and choose the model's Initial State.
- Add any reusable events and actions under Editor → Events and Editor → Actions.
- Select a state and assign its ordered Entry Actions and Exit Actions.
- Define state-and-event destinations in Editor → Transition Table, or create equivalent semantic transitions in Chart.
- Choose File → Validate State Machine and review the result on Editor (State Machine Info) and in Console.
- Choose File → Save As to write the portable JSON project.
You can save a structurally sound draft before it is complete. A project with no states or no initial state opens a warning that lists every missing requirement. Save Anyway writes the draft; Cancel writes nothing. Hosting and simulation remain unavailable until complete validation succeeds.
The incomplete Save example shows this warning with the initial state unset.
Opening the Light-Switch Example
The built-in server starts with a complete light-switch demonstration project. To copy that hosted project into the authoring workspace:
- Wait until the status bar reports Server: Connected.
- Choose File → Pull Model from Server.
- If an unsaved project is already open, review the replacement warning. Save it first or explicitly confirm that it may be replaced.
- Open Editor or Chart to inspect the light-switch states, events, actions, and transitions.
- Choose File → Save As if you want a separate local JSON copy.
Pull replaces the authoring workspace with the hosted project. It does not create a Simulator session. The built-in server retains its hosted revision when you disconnect and reconnect; an explicit server restart recreates the worker, reloads the bundled light-switch project, and closes earlier sessions.
Compare the loaded diagram with the complete light-switch Chart.
Saving and Reopening Projects
Choose File → Save As to select a destination for a new or copied project. After a capable browser associates a file with the project, File → Save can write to the same destination. Browsers without persistent file-handle support use one JSON download for each save operation.
To reopen a project:
- Choose File → Open.
- Select the Automata Lab JSON file.
- If the current project has unsaved changes, decide whether to save, discard, or cancel before replacement.
- Review any incomplete-project acknowledgement or blocking error.
Opening is transactional. Malformed JSON, unsupported versions, duplicate names or transition keys, unknown properties, dangling references, invalid metadata, and exceeded limits leave the current project untouched. A structurally and referentially sound project with no states or no initial state may open after an acknowledgement and remains editable.
Understanding Validation Messages
Choose File → Validate State Machine whenever you want a complete validation result. Validation also runs at strict boundaries such as hosting or simulation.
Messages can appear in two places:
- A dialog explains a blocking error, warning, confirmation, or acknowledgement that needs immediate attention; and
- The Console retains validation and operation details so you can inspect them later.
Console rows include severity, a stable diagnostic code where useful, the source, a concise message, and sometimes a context action. Use the Messages, Warnings, and Errors filters to change what is visible without deleting entries. Clear removes retained entries.
A disabled command is not itself a validation failure. Its accessible description explains the unmet condition, such as no open project, an incomplete model, a disconnected server, or no active Simulator session. Resolve that condition and validate again before retrying the workflow.
The Console example shows a Message, Warning, and Error with their codes and context actions.
Previous: Introduction
Next: State-Machine Concepts